
How to Replace a Ceiling Fan with a Light Fixture? A Comprehensive Guide
At Peaksearchers, we understand the importance of having a well-functioning and aesthetically pleasing ceiling light fixture in your home. If you’re looking to replace your old ceiling fan with a new light fixture, you’ve come to the right place.
In my situation, I was not an expert at the time, so when I encountered the same problem, I was at a loss for what to do. However, after some help from a friend, I was able to complete it on my own.
In this comprehensive guide, we will provide you with step-by-step instructions on how to replace a ceiling fan with a light fixture, along with valuable tips and tricks to ensure a successful installation.
Step 1: Gather the Tools and Materials
Before you begin the installation process to replace your old ceiling fan with a new light fixture, it’s essential to gather all the necessary tools and materials. Here’s a list of items you’ll need:
- Screwdriver (Phillips and flathead)
- Wire stripper
- Wire connectors
- Voltage tester
- Light fixture kit
- Ladder
- The circuit breaker or fuse box
Step 2: Turn Off the Power and Remove the Ceiling Fan
Safety should always be a top priority when working with electrical installations. To ensure your safety, start by turning off the power to the ceiling fan at the circuit breaker or fuse box. Once the power is off, use a voltage tester to verify that there is no electricity flowing to the fan.
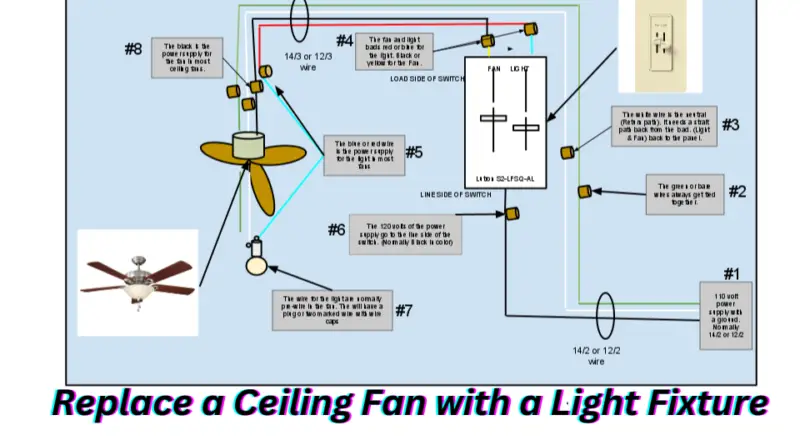
Next, use a screwdriver to remove the fan blades and any other attachments. Carefully disconnect the wiring from the fan, making sure to note the connections for future reference. Once all the wiring is disconnected, remove the fan from the ceiling.
Step 3: Install the Light Fixture
With the ceiling fan removed you’re now ready to install the light fixture. Follow these steps:
- Attach the fixture bracket to the ceiling using the provided screws, ensuring it is securely in place.
- Connect the wires from the light fixture to the corresponding wires from the electrical box using wire connectors. It’s essential to ensure that the connections are tight and secure.
- Attach the light fixture to the bracket using the screws provided, following the manufacturer’s instructions.
Step 4: Test and Finish
Once the light fixture is securely installed, it’s crucial to test it to ensure it’s working correctly. Turn the power back on at the circuit breaker or fuse box, and use the light switch to test the functionality of the fixture. If everything is working correctly, you’re all set!
To finish the installation, reattach any other attachments, such as light bulbs or covers, following the manufacturer’s instructions. Double-check all connections to ensure they are secure and properly tightened.
Tips and Tricks for a Successful Installation
- Double-check the manufacturer’s instructions for both the ceiling fan and light fixture to ensure you are following the correct installation process.
- Use a voltage tester to verify that there is no electricity flowing to the fan before starting any work.
- Label or take a photo of the wiring connections of the ceiling fan before disconnecting them to make it easier to reconnect them correctly later.
- Securely tighten all screws and wire connectors to ensure a safe and stable installation.
- Use wire connectors that are rated for the appropriate wire size and follow electrical code requirements.
- If you are unsure about any step of the installation process, it’s best to consult a qualified electrician for assistance.
Common Troubleshooting Tips
Here are some typical troubleshooting advice in case you run into any problems throughout the installation process:
- If the light fixture is not turning on, double-check the wiring connections and make sure the light bulbs are properly installed.
- If the light fixture is flickering or dimming, it could be due to loose wiring connections. Double-check and tighten all wire connectors.
- If the ceiling light fixture wobbles or is not securely attached to the ceiling, double-check the bracket installation and make sure it is properly secured.
Also Read: Fix Xbox App Notifications Not Working On iPhone? Here’s What To Do
FAQ’s
How To replace a ceiling fan with a regular ceiling light?
Here’s a step-by-step guide on how to replace a ceiling fan with a regular ceiling light:
Turn off the power
Before you start any electrical work, make sure to turn off the power to the ceiling fan at the circuit breaker or fuse box to prevent any accidents.
Remove the ceiling fan
Using a screwdriver or drill, remove the screws or bolts that attach the ceiling fan to the ceiling. Carefully disconnect the wires that are connected to the fan, taking note of their locations and colors for later reconnection.
Install the ceiling light bracket
Once the ceiling fan is removed, you will need to install a ceiling light bracket. The bracket usually comes with a light fixture and is designed to support the weight of the light. Follow the manufacturer’s instructions to securely attach the bracket to the ceiling using screws or bolts.
Connect the wires
Next, connect the wires from the ceiling light to the corresponding wires in the ceiling. Typically, you will need to connect the black or red wire (hot), white wire (neutral), and green or bare wire (ground) from the light fixture to the corresponding wires in the ceiling using wire nuts or connectors. If you are not confident in your electrical skills, it is recommended to seek the assistance of a qualified electrician.
Attach the ceiling light
Once the wires are connected, attach the ceiling light to the bracket using screws or clips provided by the manufacturer. Make sure the light is securely attached and leveled.
Install the light bulbs and cover
Insert the light bulbs into the light fixture and attach the light cover or shade according to the manufacturer’s instructions.
Turn on the power and test the light
Finally, turn on the power at the circuit breaker or fuse box and test the ceiling light to ensure it is working properly.
That’s it! You have successfully replaced a ceiling fan with a regular ceiling light. Remember to always follow safety precautions when working with electricity and consult a professional electrician if you are unsure about any part of the process.
How To Replace Ceiling Fan With Can Light?
Here is a concise version:
- Turn off the power at the circuit breaker.
- Remove the ceiling fan and disconnect the wiring.
- Install the can light housing according to the manufacturer’s instructions.
- Connect the wiring to the can light housing.
- Attach the can light trim.
- Install the light bulb.
- Turn on the power and test the can light.
- Patch and paint the ceiling if needed.
Note: If unsure, hire a licensed electrician for safety.
How do Replace the ceiling fans with a flush mount light?
- Turn off the power at the circuit breaker or fuse box.
- Remove the ceiling fan by unscrewing or unbolting it from the ceiling, and disconnecting the wiring following the manufacturer’s instructions.
- Install the flush mount light fixture by attaching it to the ceiling according to the manufacturer’s instructions.
- Connect the electrical wiring from the existing electrical box to the flush mount light fixture, matching the black (hot), white (neutral), and green or bare (ground) wires using wire nuts.
- Attach the light fixture cover or canopy as per the manufacturer’s instructions.
- Install the light bulbs in the fixture according to the manufacturer’s recommendations.
- Turn on the power at the circuit breaker or fuse box and test the flush mount light to ensure it is working properly.
- Patch and paint the ceiling if needed to cover any holes left from the previous ceiling fan installation.
Note: If you are not experienced with electrical work, it’s best to hire a licensed electrician for safety.
Also Read: How To Replace Ceiling Fan With Light Fixture 2 Switches – A DIY Solution
Conclusion
Replacing a ceiling fan with a light fixture can be a straightforward and rewarding DIY project that can instantly update the look and functionality of a room.
Following the steps outlined in this guide and taking the necessary safety precautions, you can successfully complete the installation and enjoy the benefits of a new and improved ceiling light fixture in your home.
