
How To Replace Ceiling Fan With Light Fixture 2 Switches – A DIY Solution
Replacing a ceiling fan with a light fixture can be an easy and budget-friendly way to update your home’s decor. If you have two switches that control the fan and light separately, this project can be done in no time.
In my case, when I faced the same issue, I did not know what to do because I was not an expert in the beginning. But, then one of my friends guided me due to which I was able to Do it myself. Before getting started, it’s very important to make sure that you’ve gathered all the necessary tools and materials.
What is a ceiling fan and what does it do?
A ceiling fan is generally an electrical appliance that is suspended from the ceiling of a room. It circulates air using rotating blades. It helps to improve ventilation in a room. Also, It makes a person feel cooler in summer by creating a breeze and circulating air from windows or doors around the room.
Ceiling fans can also help to distribute heat more effectively during colder months when the rotation of the blades can be reversed.
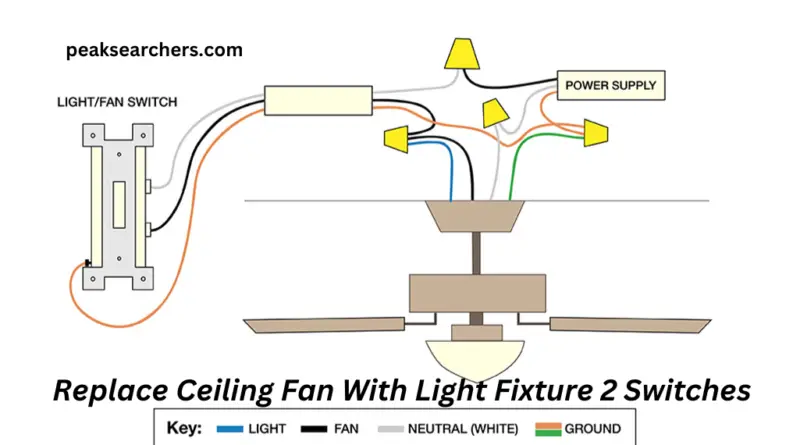
If you are considering replacing a ceiling fan with a light fixture, it’s important to note that there are typically two switches that control each function.
One switch controls power to the light while the other switch controls power to the fan. It’s important to ensure that both switches are properly wired and functioning before installing your new fixture.
Overall, ceiling fans are an excellent addition to any home or office as they provide energy-efficient cooling and heating solutions. They come in different sizes, styles, colors, and designs so you can easily find one that suits your decor preferences. With proper maintenance, you can enjoy years of comfort and savings with your ceiling fan!
How do you replace a ceiling fan with a light fixture?
First, turn off the power supply to the ceiling fan by flipping off the circuit breaker switch. Then, remove the ceiling fan and all its components such as blades, light kit, and mounting bracket. Next, install a new electrical box that is compatible with your light fixture and secure it firmly to the ceiling joist.
Secondly, connect the wiring for the light fixture where you removed the wires from your ceiling fan. Connect white to white and black to black or red (depending on if you have a three-way switch). If there is a green wire or ground wire in your new light fixture; attach it to other green wires in your electrical box.
Lastly, put up your new light fixture using instructions given by your manufacturer. A crucial step here is making sure that all screws are tight to prevent wobbling or falling of lights.
Once done with the installation process screw in bulbs accordingly then test out switches before turning back on the circuit breaker switch. Congratulations! You’ve just replaced a ceiling fan with a beautiful light fixture!
The benefits of replacing a ceiling fan with a light fixture
One of the biggest benefits of replacing a ceiling fan with a light fixture is that it can update the look and feel of a room. Ceiling fans can quickly become outdated, whereas modern light fixtures can make your space appear more contemporary and stylish.
Additionally, installing only one switch for the light fixture instead of two separate switches for the fan and light simplifies your electrical system, making it easier to use.
Another benefit is that you’ll likely save on energy costs by using a light fixture instead of a ceiling fan. While fans are great at keeping rooms cool in the summer, they consume considerably more electricity than simple lighting fixtures.
If you’re trying to reduce your energy usage or want to lower your monthly bills, replacing an old ceiling fan with an efficient LED lighting bulb could be just what you need.
In conclusion, if you’re looking for ways to freshen up your home decor while also saving money on electricity costs, consider swapping out that old ceiling fan for a modern lighting fixture. Not only will this upgrade add style to any room but it will also simplify your electrical system and help reduce your energy consumption.
Costs and Time Required to replace a Ceiling Fan with a Light Fixture
Replacing a ceiling fan with a light fixture can be done in 2-3 hours, depending on the complexity of the installation. The process involves turning off power to the existing ceiling fan, removing it from its mounting bracket, and disconnecting its wires.
Next, you will need to remove the mounting bracket and install one that is compatible with your new light fixture. The wiring for the new light fixture will then need to be installed and connected to the switches.
The cost of replacing a ceiling fan with a light fixture varies depending on several factors. Like the type of light fixture being installed, electrician fees (if needed), and materials required for installation. On average, homeowners can expect to spend between $100-$300 for this type of project.
It is important to note that in case you are not comfortable working with electricity. Also, if you do not have experience with electrical installations, it may be best to hire a professional electrician. This will ensure that the job is done correctly and safely, reducing any risks associated with electrical work.
FAQ’s
Q: Can I replace a ceiling fan with a light fixture that has only two switches?
A: Yes, you can replace your ceiling fan with a light fixture using the same wiring and switches. However, it is important to note that not all wiring configurations are created equal.
Before you begin any electrical work, make sure to turn off the power source at the breaker box. Then, use a voltage tester to confirm there is no electricity flowing through the wires.
Q: Do I need to hire an electrician for this job?
A: It depends on your level of experience and comfort working with electricity. If you are unsure about any aspect of the installation process, you should get the help of a professional electrician.
They have the expertise and tools necessary to ensure that everything is done safely and up to code. However, the main motive of our blog is to make you independent and make sure that you do everything yourself.
Q: What if my existing wiring doesn’t match up with my new light fixture?
A: In some cases, you may need to rewire or install additional components in order for your new light fixture to work properly. This can be especially true if your old ceiling fan had more than two switches. Or it was connected to other features such as a remote control or dimmer switch.
Again, if you are uncertain about how to proceed, it’s best to seek out professional help rather than risk injury or damage.
What is the difference between a ceiling fan with light and a light fixture with 2 switches?
A: A ceiling fan with light is a combined unit that has both a fan and a light fixture controlled by a single switch. A light fixture with 2 switches. On the other hand, refers to a setup where there are two separate switches to control the light fixture. One switch controls the on/off function of the light. The other switch controls the brightness level of the light.
Also read: How to Fix a Wobbly Ceiling Fan in Five Easy Steps
Conclusion
In conclusion, replacing a ceiling fan with a light fixture that has two switches requires careful consideration and attention to detail. It is important to turn off the power supply before starting any work on the electrical wiring.
In addition, it is recommended to have basic knowledge of electrical systems or consult a professional electrician for assistance.
When installing the new light fixture, be sure to follow the manufacturer’s instructions carefully and securely attach all wires. Hopefully, your issue will have been resolved.
