
How To Replace Ceiling Fan Capacitor? A DIY Guide
The ceiling fan capacitor is a small but crucial component of your fan’s motor. It stores energy and helps to start the motor when you switch on the fan. However, over time, it can wear out or malfunction, causing your fan to run slowly or not at all. Fortunately, replacing a ceiling fan capacitor is a relatively simple task that can be completed in just a few easy steps.
I did not know how to replace my capacitor because I was not a veteran. Then, I searched through the internet and got to know that it was such an easy task to do so. Everything I did is explained in the article.
Importance of Ceiling Fan Capacitor
The ceiling fan capacitor is a crucial component of the ceiling fan’s motor. It stores electrical energy and provides the required torque to start the motor.
A faulty or worn-out capacitor can cause your ceiling fan to run slowly or not at all. Therefore, it is essential to replace your ceiling fan’s capacitor as soon as you detect any issues. Simply read the points below to change the capacitor.
Step 1: Turn Off the Power Supply
The first step in replacing a ceiling fan capacitor is to turn off the power supply. This ensures that you will not be electrocuted during the process. To do this, go to your circuit breaker box and find the switch that controls the power to your ceiling fan. Flip it off so that there is no electricity flowing to the fan.
It’s important to note that turning off just the light switch will not completely shut off the power supply, as there may still be electricity flowing through the wires. You must go to your circuit breaker box and flip off the correct switch.
Once you have turned off the power supply, wait a few minutes before working on your ceiling fan capacitor. This allows any residual electricity in the wires or components of your fan to dissipate, ensuring your safety while working on it.
Step 2: Remove the Fan Blades
To replace your ceiling fan capacitor, you’ll need to remove the fan blades. First, turn off the power to your ceiling fan by flipping the circuit breaker or removing the fuse. Next, unscrew and remove any light fixtures or other accessories attached to the fan blades. Then locate the screws that attach each blade to the motor housing.
Using a screwdriver, carefully unscrew each blade from its mounting bracket. It’s best to work on one blade at a time so you don’t lose track of which screw goes where. Once all of the blades are removed, set them aside in a safe place until it’s time to reattach them later.
It’s important to be gentle when removing your ceiling fan blades as they can easily become warped or damaged if mishandled. Take your time and use caution throughout this process.
With the blades removed, you’ll be one step closer to successfully replacing your ceiling fan capacitor and restoring full functionality to your overhead cooling system!
Step 3: Locate the Capacitor
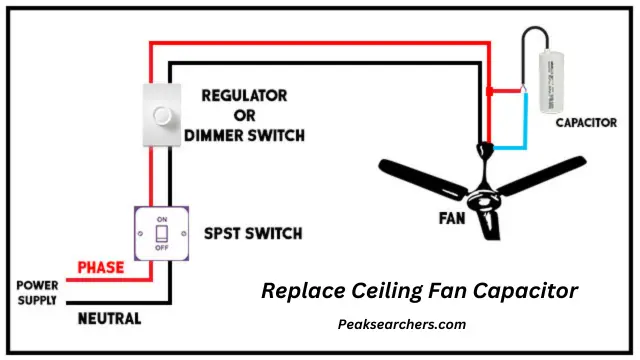
Once you have identified the malfunctioning capacitor, the next step is to locate it. Ceiling fan capacitors are typically located in one of two places: either within the switch housing or inside the motor housing.
If it is located in the switch housing, you will need to remove the light kit and/or decorative cover to access it. Look for a small rectangular box with wires attached to it. If you are unsure which component is the capacitor, refer to your fan’s instruction manual or consult an expert.
If the capacitor is located inside the motor housing, you will need to turn off power at your circuit breaker and remove any screws holding on the motor cover. Once removed, look for a small cylindrical object with wires attached.
Make sure to take note of how each wire is connected so that you can properly install the replacement capacitor later on.
Step 4: Remove the Old Capacitor
Once you have identified the faulty capacitor, it’s time to remove it. Make sure that the power supply to the fan is turned off before proceeding with this step. This will ensure your safety while working on electrical appliances.
The old capacitor is usually located in a metal casing or a plastic housing near the motor. You can use a screwdriver or pliers to loosen any screws holding the casing in place and gently pull it away from the motor body. Be careful not to damage any wires connecting the capacitor to other parts of the fan.
Once you’ve removed the casing, take note of how each wire is connected to the old capacitor so that you can easily connect them later on. Then, use your pliers or fingers to gently pull out and disconnect each wire from their terminals on both sides of the old capacitor. Finally, dispose of your old ceiling fan capacitor responsibly, following local regulations for electronic waste disposal.
Step 5: Install New Capacitor
To install a new capacitor in your ceiling fan, first disconnect the power supply to the fan. Remove the housing covering the electrical connections and locate the old capacitor. Make note of which wires are connected to which terminals on the old capacitor before removing it.
Next, connect those same wires to their corresponding terminals on the new capacitor. Be sure to match the capacitance rating of the old capacitor with that of your replacement part. Once all wires are securely connected, replace any housing that was removed earlier and reapply power to test out your newly installed capacitor.
It is important to handle capacitors with caution as they can store electric charge even when disconnected from power sources. Always wear appropriate safety gear and follow installation instructions carefully for best results and avoid accidental injury or damage to equipment.
Step 6: Reattach Fan Blades and Test
Once you’ve replaced the capacitor, it’s time to reattach the fan blades and test your work. Start by lining up the holes on each blade with the corresponding holes on the motor housing.
Insert a screw into each hole, making sure that they are secure but not over-tightened. Once all screws are in place, double-check to make sure that all blades are evenly spaced.
Next, turn the power back on and test your ceiling fan. If everything is working properly, you should feel a breeze coming from the fan as it spins. If you notice any unusual sounds or vibrations, turn off the power immediately and check for loose screws or misaligned blades.
It’s also important to keep in mind that some fans may have specific instructions or requirements for reattaching blades. Be sure to consult your owner’s manual or contact a professional if you’re unsure about how to proceed.
With a little patience and attention to detail, however, replacing your ceiling fan capacitor can be an easy DIY job that will save you time and money in the long run.
FAQ’s
Q: What is a ceiling fan capacitor?
A: A ceiling fan capacitor is a small electronic component that stores and releases electrical energy to help start the motor of your ceiling fan.
Q: How do I know if my ceiling fan capacitor is faulty?
A: If your ceiling fan doesn’t start or it starts slowly, makes noise, hums, or stops working after some time, then it’s likely that your capacitor needs to be replaced. You can test this by using the help of a multimeter.
Q: Can I replace the ceiling fan capacitor myself?
A: Yes, you can replace the capacitor yourself. However, make sure to turn off the power supply before starting any repairs or replacements. The process involves identifying the faulty part and unscrewing it from its position.
Be sure to take note of where each wire connects before disconnecting them. Then connect and install the new part in its place following instructions on how to connect each wire correctly according to color codes provided by manufacturers.
Also read: Fix Ceiling Fan Lights Not Working – A Comprehensive Solution
Conclusion
In conclusion, now that you’ve successfully replaced your ceiling fan capacitor, it’s time to enjoy your newly repaired ceiling fan. Be sure to turn the power back on and test out your fan to ensure it’s working properly. You should feel a noticeable difference in the speed and function of the fan compared to before the repair.
It’s important to note that regular maintenance can help prevent future issues with your ceiling fan. Keep an eye on any unusual noises or slow speeds, and consider cleaning or lubricating the blades every few months.
By taking care of your ceiling fan, you’ll be able to enjoy its benefits for years to come without having to worry about costly repairs or replacements down the line.
