
How To Remove Hard Drive From Laptop? A Complete Guide
At Peaksearchers, we understand the importance to safely remove a hard drive from a laptop. Whether you’re upgrading your storage, replacing a faulty drive, or simply needing to access your data, it’s crucial to follow the right steps to avoid any potential damage or data loss. In this comprehensive guide, we will walk you through the process of safely removing a hard drive from your laptop, ensuring that you can confidently complete the task without any complications.

1. Preparing for Hard Drive Removal
Before you begin the process of removing the hard drive from your laptop, it’s essential to take a few preparatory steps. These steps will ensure that you have a smooth experience and minimize the risk of damaging any components.
2. Tools Required
To successfully remove the hard drive from your laptop, you’ll need the following tools:
- Screwdriver (specific to your laptop model)
- Anti-static wrist strap or mat (optional, but recommended)
- Clean and static-free workspace
- A small container to store screws
3. Step-by-Step Guide to Removing the Hard Drive
Step 1: Shutting Down and Disconnect the Laptop
Before you begin the hardware removal process, make sure your laptop is powered off completely. Disconnect the power adapter and any other external peripherals, such as USB devices or Ethernet cables.
Step 2: Removing the Battery (If Applicable)
If your laptop has a removable battery, it’s important to remove it before accessing the internal components. Refer to your laptop’s user manual or the manufacturer’s website for specific instructions on removing the battery.
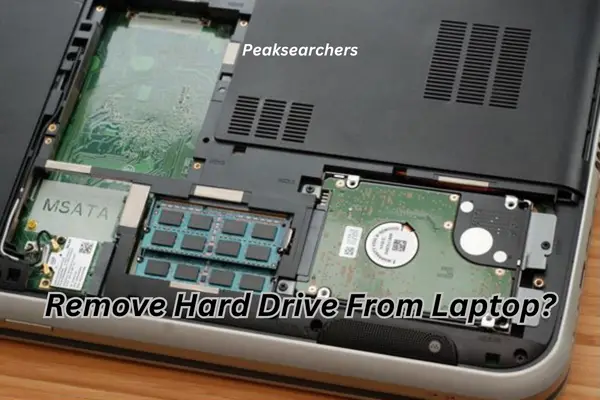
Step 3: Locating the Hard Drive Compartment
Different laptop models have varying designs and placements for the hard drive compartment. Typically, you can find the compartment on the bottom or side of the laptop. Consult your laptop’s user manual or the manufacturer’s website to locate the exact position of the hard drive.
Step 4: Removing the Hard Drive Cover
Once you’ve located the hard drive compartment, use the appropriate screwdriver to remove the screws securing the cover. Place the screws in a small container to avoid misplacing them.
Step 5: Disconnecting the Hard Drive Cables
Inside the compartment, you’ll find the hard drive connected to the laptop via cables. Gently disconnect the cables by carefully pulling them away from the hard drive connectors. If there are any retention clips or screws holding the cables in place, remove them accordingly.
Step 6: Removing the Hard Drive from Its Bay
With the cables detached, carefully slide the hard drive out of its bay. Be cautious not to apply excessive force or twist the drive during removal. If the hard drive feels stuck, double-check for any additional screws or connectors that may be holding it in place.
4. Handling the Hard Drive with Care
While handling the hard drive, it’s crucial to exercise caution to prevent any damage. Avoid touching the exposed circuitry or the connectors directly. Instead, hold the drive from its sides or use an anti-static wrist strap to minimize the risk of electrostatic discharge.
5. Safety Precautions
- Always back up your data before removing the hard drive to prevent data loss.
- Handle the hard drive delicately to avoid physical damage.
- Keep the removed hard drive away from magnets, excessive heat, and moisture.
- Store the hard drive in an anti-static bag or an ESD-safe container if you plan to reuse or transport it.
6. Additional Tips and Troubleshooting
Tip 1: Keep Track of Screws and Components
As you proceed with the hard drive removal process, it’s important to keep track of all the screws and components you remove. Placing them in a small container or using a magnetic mat can help prevent misplacement and make reassembly easier.
Tip 2: Consult Manufacturer Documentation
If you’re unsure about any specific steps or encounter unfamiliar components during the hard drive removal, it’s always advisable to consult your laptop’s user manual or the manufacturer’s documentation. They can provide valuable insights and model-specific instructions to ensure a smooth removal process.
Troubleshooting: Stuck or Stubborn Hard Drive
In some cases, you may encounter a hard drive that is stuck or difficult to remove from its bay. If this happens, follow these troubleshooting steps:
- Double-check for any additional screws or connectors holding the hard drive in place.
- Ensure that you have disconnected all cables and removed any retention clips properly.
- Gently wiggle the hard drive back and forth while applying slight pressure to loosen it from its position.
- If the hard drive remains stuck, avoid using excessive force that could cause damage. Instead, consider seeking professional assistance or contacting the manufacturer’s support for guidance.
Also Read: Why Won’t My Laptop Connect to Wi-Fi? A Comprehensive Guide
FAQ’s
Does removing the hard drive remove all data?
Removing the hard drive physically from a computer or device does not automatically remove all data stored on it. The hard drive itself is where the data is stored, but simply disconnecting or removing it does not erase the data it contains.
If you want to ensure that the data on a hard drive is permanently removed, you would need to take additional steps. The most secure method is to use specialized software to overwrite the entire hard drive with random data multiple times, making it extremely difficult or impossible to recover the original data.
Another option is to physically destroy the hard drive, such as by shredding or drilling holes into it, which renders the data irretrievable. However, this method is irreversible and makes the drive unusable.
It’s important to note that if you plan on disposing of or selling a computer, it’s crucial to properly erase the data to protect your privacy and prevent unauthorized access to your personal information.
How do I remove my laptop hard drive before recycling it?
To remove your laptop hard drive before recycling, you can follow these general steps:
- Power off your laptop: Shut down your laptop properly and disconnect it from any power source.
- Gather necessary tools: Depending on your laptop model, you may need a small screwdriver or other tools to access and remove the hard drive. Check your laptop’s documentation or the manufacturer’s website for specific instructions.
- Remove the back panel or access cover: Most laptops have a removable panel on the bottom that provides access to internal components. Use your screwdriver or any applicable tool to remove the screws holding the panel in place. Carefully set the screws aside in a safe place.
- Locate the hard drive: Once you have removed the back panel, you should be able to identify the hard drive. It is usually a rectangular-shaped component and may have a metal or plastic casing around it.
- Disconnect the hard drive: The hard drive will be connected to the laptop’s motherboard via a cable or connector. Gently disconnect the cable or connector by pulling it straight outwards. If there are screws or brackets holding the hard drive in place, remove them as well.
- Remove the hard drive: Once disconnected, you can carefully slide the hard drive out of its slot or bay. Be cautious not to damage any other components while doing this.
- Secure the hard drive: If you plan to recycle the hard drive separately, you can place it in an antistatic bag or wrap it in a protective material. This will help prevent any damage during transportation.
Remember that the above steps are general guidelines, and the specific process may vary depending on your laptop model. It’s always recommended to consult your laptop’s documentation or the manufacturer’s website for detailed instructions on removing the hard drive.
Can HDD be removed from the laptop?
Yes, in most laptops, the hard disk drive (HDD) can be removed. Laptops are designed to allow users to access and replace various components, including the HDD. Removing the HDD gives you the option to upgrade to a larger capacity drive, replace a faulty drive, or securely dispose of the drive.
- Power off your laptop: Shut down your laptop properly and unplug it from any power source.
- Remove the back panel or access cover: Most laptops have a removable panel on the bottom that provides access to the internal components. Use a screwdriver or any applicable tool to remove the screws holding the panel in place. Set the screws aside in a safe place.
- Locate the hard disk drive (HDD): Once the back panel is removed, you should be able to locate the HDD. It is usually a rectangular-shaped component and may have a metal or plastic casing around it.
- Disconnect the HDD: The HDD will be connected to the laptop’s motherboard via a cable or connector. Gently disconnect the cable or connector by pulling it straight outwards. If there are screws or brackets holding the HDD in place, remove them as well.
- Remove the HDD: Once the connection is detached, you can carefully slide the HDD out of its slot or bay. Be cautious not to damage any other components while doing this.
- Replace or store the HDD: If you are replacing the HDD, you can install the new drive by reversing the steps above. If you plan to store or dispose of the HDD, it’s advisable to store it in an antistatic bag or wrap it in a protective material to prevent damage.
Also Read: How To Charge Laptop With Power Bank? A Step By Step Guide
Conclusion
Removing a hard drive from a laptop requires careful attention to detail and adherence to safety guidelines. By following the step-by-step instructions outlined in this guide, you can safely remove the hard drive from your laptop without any complications.
Remember to exercise caution, handle the components delicately, and always refer to your laptop’s user manual or manufacturer’s website for specific instructions. If you encounter any difficulties or uncertainties during the process, it’s recommended to seek professional assistance to avoid any potential damage or data loss.
