
Fix The L Button On Your Nintendo Switch Like A Pro – The Ultimate Guide
The Nintendo Switch is a popular gaming console that has been enjoyed by millions of people worldwide. It is a portable gaming device that allows you to play your favorite games on the go or at home. However, like any other gaming device, the Nintendo Switch is prone to wear and tear, and one of the most common issues that users face is a faulty L button.
The L button on the Nintendo Switch is essential for many games, and if it’s not functioning correctly, it can make playing games a frustrating experience.
I also faced this issue, but after trying some fixes, I finally concluded. Don’t worry, in this article, we will guide you on how to fix the L button on your Nintendo Switch like a pro.
Why is the L Button on the Nintendo Switch Not Working?
Before we dive into the solutions, it’s essential to understand why the L button on your Nintendo Switch may not be working correctly. There are some of the several reasons why this could happen, it includes:
- Dust and debris accumulation under the L button
- Physical damage to the L button
- Manufacturing defects
How to Fix the L Button on Your Nintendo Switch
Now that we know why the L button on your Nintendo Switch may not be working let’s explore how you can fix it.
Cleaning the L Button
One of the most common reasons for L button issues is the accumulation of dust and debris under the button. This can be easily fixed by cleaning the button. Here’s how you can do it:
- Turn off your Nintendo Switch and remove the Joy-Con from the console.
- Use a soft-bristled toothbrush to brush away any dirt or debris under the L button.
- If the debris is stubborn, use a toothpick or a small brush to remove it gently.
- Once you’re done, reattach the Joy-Con to the console and turn it on.
If cleaning the button doesn’t solve the issue, you may need to replace the L button.
Replacing the L Button
If the L button on your Nintendo Switch is physically damaged or has a manufacturing defect, you may need to replace it. Here’s how you can do it:
- Purchase a replacement L button from a reputable seller.
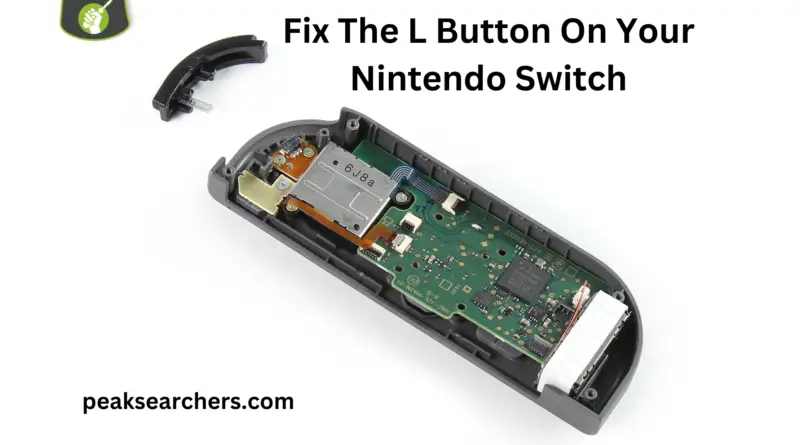
- Turn off your Nintendo Switch and remove the Joy-Con from the console.
- Use a screwdriver to unscrew the four screws on the back of the Joy-Con.
- Carefully remove the backplate of the Joy-Con.
- Locate the L button and carefully remove it by unscrewing the two screws holding it in place.
- Replace the old L button with the new one and screw it back in place.
- Reattach the backplate of the Joy-Con and screw it back in place.
- Reattach the Joy-Con to the console and turn it on.
Check for Physical Damage
Inspect the button for any visible damage or wear and tear. If you see any cracks or breaks, then you may need to replace the button entirely. However, if there are no visible signs of damage, you need to replace the button.
It is pretty easy to change the button. Follow this article to know more.
Calibrate the Joy-Con
Calibrating your Joy-Con can help fix L button issues. Start by going to the Home menu and selecting System Settings. After that, you need to scroll down and select Controllers and Sensors.
Then, Select Calibrate Control Sticks and follow the instructions on the screen. This will recalibrate the L button and fix any sensitivity issues.
Reset the Joy-Con
If calibrating the Joy-Con did not work, then try resetting it. Start by detaching the Joy-Con from the console. Then, hold down the sync button until the LED lights start flashing.
Once the Joy-Con has reset, reattach it to the console and test the L button. Hopefully, after it the L button will work properly.
Restart the Console
Restarting your console is a simple but effective method that can fix any software glitches that may be causing the L button to malfunction.
To restart your console, hold down the power button on the top of the console for a few seconds until the power options appear on the screen. Then, select Restart and wait for the console to reboot.
Update the Firmware
Updating your Nintendo Switch’s firmware can fix any software bugs that may be causing the L button to malfunction.
To update your console’s firmware, make sure it’s connected to the internet and go to the Home menu, select System Settings, and then select System. Scroll down to System Update and follow the on-screen instructions to update your console’s firmware.
Reset the Joy-Con
If calibrating the Joy-Con did not work, then try resetting it. Start by detaching the Joy-Con from the console. Then, hold down the sync button until the LED lights start flashing.
Once the Joy-Con has reset, reattach it to the console and test the L button. Most probably, the button will be working absolutely fine.
Tips to Prevent L Button Issues in the Future
Prevention is always better than cure, and there are a few things you can do to prevent L button issues in the future:
- Keep your Nintendo Switch and Joy-Con clean and free from.
- Regularly clean your Nintendo Switch and Joy-Con with a soft cloth to prevent dust and debris buildup.
- Use a protective case for your Nintendo Switch and Joy-Con to prevent physical damage.
- Avoid using the L button excessively, especially during intense gameplay.
Frequently Asked Questions (FAQs)
Can I fix the L button on my Nintendo Switch myself?
Yes, you can fix the L button on your Nintendo Switch yourself by following the steps outlined in this article. However, if you’re not confident that you can do it, it’s always best to go to a professional.
How much does it cost to replace the L button on the Nintendo Switch?
The cost of replacing the L button on the Nintendo Switch can vary depending on where you get it fixed. It can cost about $10 to $50.
Will fixing the L button on my Nintendo Switch void the warranty?
If your Nintendo Switch is still under warranty, opening it up and fixing it yourself can void the warranty. It’s always best to check with the manufacturer or a professional before attempting any repairs.
Also, go through Nintendo Switch Refusing to Connect to Your TV.
Conclusion
Fixing the L button on your Nintendo Switch doesn’t have to be a complicated process. By following the steps outlined in this ultimate guide, you can fix the issue like a pro.
Whether you choose to clean the L button or replace it, you can get back to playing your favorite games in no time. Remember to take care of your Nintendo Switch and Joy-Con to prevent issues in the future.
