
What is SoundCheck on iPhone? A Comprehensive Guide
In today’s tech-savvy world, our smartphones have become more than just devices for communication. They are our personal assistants, entertainment hubs, and so much more. One feature that often goes unnoticed but greatly contributes to our overall experience is “SoundCheck” on iPhone. In this article, we will delve into the world of SoundCheck, exploring its purpose, functionality, and how you can make the most of it for an enhanced auditory experience.

Introduction to SoundCheck
SoundCheck is a remarkable feature integrated into iPhones that ensures consistent and balanced audio playback across various tracks and sources.
Whether you’re listening to your favorite songs, podcasts, audiobooks, or even watching videos, SoundCheck strives to maintain uniform sound levels.
How Does SoundCheck Work?
At its core, SoundCheck works by analyzing the audio characteristics of each track in your library. It then adjusts the playback volume to maintain a consistent perceived loudness level.
This means that you won’t need to constantly fiddle with the volume controls when transitioning from a soft-spoken podcast to a high-energy song.
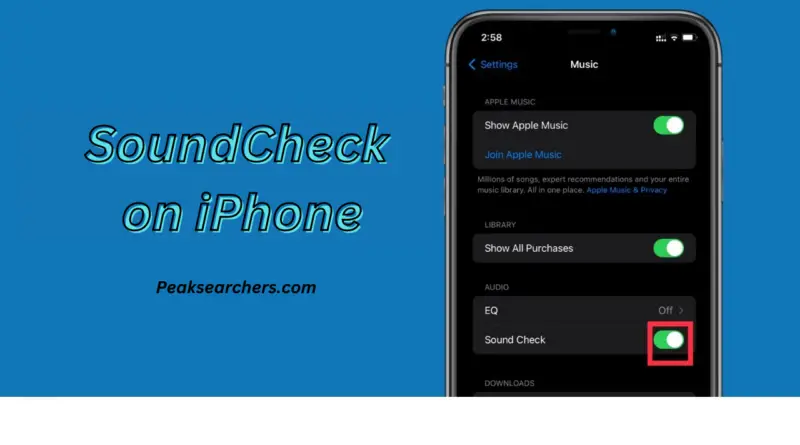
Enabling SoundCheck on Your iPhone
Enabling SoundCheck is a breeze. Follow these steps:
- Open the Settings app on your iPhone.
- Scroll down and tap on “Music.”
- Under the “Playback” section, toggle on the “SoundCheck” option.
Benefits of Using SoundCheck
The benefits of SoundCheck are manifold:
- Consistency: Enjoy a seamless listening experience with consistent audio levels.
- No More Volume Surprises: Say goodbye to sudden loudness jumps between tracks.
- Preservation of Hearing: SoundCheck prevents potentially harmful volume spikes that can impact your hearing.
Adjusting SoundCheck Settings
While SoundCheck works wonders out of the box, you can customize it according to your preferences:
- Customized Sound: If you prefer slightly higher or lower levels, you can adjust the SoundCheck settings in the Music app.
- Track Independence: SoundCheck treats each track individually, so you get the optimal listening experience for every piece of content.
Sound Quality vs. Volume
It’s important to note that SoundCheck on iPhone focuses on maintaining consistent loudness levels, not altering the actual sound quality of the audio. This means that the timbre, bass, treble, and other sound characteristics remain unchanged.
SoundCheck and Different Audio Sources
SoundCheck on iPhone isn’t limited to the Music app. It extends its influence to videos, podcasts, audiobooks, and more, providing a cohesive experience across all media.
Compatibility with Third-Party Apps
The good news is that many third-party music and media apps have integrated SoundCheck compatibility. This ensures that your audio experience remains consistent, no matter which app you’re using.
SoundCheck: A Boon for Audiophiles
Audiophiles, known for their keen ear and appreciation of sound quality, can also benefit from SoundCheck. While SoundCheck on iPhone maintains loudness consistency, it doesn’t interfere with the intricate audio details that audiophiles treasure.
Common Misconceptions about SoundCheck
There are a few misconceptions about SoundCheck that need clarification:
- Compression: SoundCheck on iPhone doesn’t apply compression to the audio; it simply adjusts loudness levels.
- Loss of Dynamic Range: SoundCheck aims to preserve the dynamic range of audio, preventing over-compression.
Troubleshooting SoundCheck Issues
Encountering issues with SoundCheck? Here are some steps to troubleshoot:
- Update iOS: Ensure your iPhone is running the latest iOS version.
- Rebuild Library: Sometimes, rebuilding your music library can resolve SoundCheck on iPhone-related glitches.
Future Developments and Updates
Apple is dedicated to enhancing the SoundCheck experience with each update, so keep an eye out for improvements and new features.
SoundCheck and Battery Consumption
You might be wondering about battery usage. Rest assured, SoundCheck’s impact on battery life is minimal, as it primarily operates in the background.
Making the Most of SoundCheck
To make the most of SoundCheck:
- Regular Updates: Keep your iPhone’s software updated to access the latest SoundCheck enhancements.
- Explore Settings: Familiarize yourself with the SoundCheck settings to tailor the experience to your liking.
Also Read: Phone Not Receiving Texts from Android: Troubleshooting and Solutions
FAQ’s
Should I use Sound Check on my iPhone?
Absolutely, you should consider using Sound Check on your iPhone if you want to ensure a consistent and comfortable listening experience when playing music.
Sound Check is a feature that’s designed to normalize the playback volume of your music tracks. This means that it will adjust the volume levels of different songs so that they’re played back at a similar perceived loudness, reducing the chances of sudden volume changes between tracks.
Here are some benefits of using Sound Check:
- Consistent Volume: With Sound Check enabled, you won’t have to constantly adjust the volume when different songs play. This can be particularly helpful when you’re listening to a playlist or an album with varying levels of loudness.
- Reduced Ear Strain: Sudden jumps in volume between tracks can be uncomfortable and potentially damaging to your ears. Sound Check helps prevent these sudden changes, making your listening experience more enjoyable and safer.
- Less Distraction: Imagine you’re in a quiet environment, and a much louder song starts playing unexpectedly. It can be disruptive. Sound Check minimizes these distractions by maintaining a more uniform volume level.
However, keep in mind that Sound Check might not be perfect for every situation. If you’re someone who enjoys the dynamic range of music and wants to experience songs as they were originally mastered, you might prefer to leave Sound Check disabled.
Additionally, Sound Check might not work perfectly with all tracks, as it relies on metadata embedded in the music files to determine the appropriate adjustments.
To enable Sound Check on your iPhone, follow these steps:
- Open the “Settings” app.
- Scroll down and tap on “Music” (or “Playback & Sound” depending on your iOS version).
- Toggle on the “Sound Check” option.
Ultimately, the decision to use Sound Check depends on your personal preferences. If you value a consistent listening experience and want to avoid sudden volume changes, it’s worth giving Sound Check a try. You can always enable or disable it based on your specific needs and preferences.
What is the purpose of the Sound Check?
The purpose of Sound Check is to ensure a more consistent and comfortable listening experience when playing music on your device, such as an iPhone or iPod.
This feature works by adjusting the playback volume of different songs to make them sound at a similar perceived loudness level. By doing so, Sound Check helps to minimize abrupt and jarring volume changes between tracks, providing a smoother and more enjoyable listening session.
The primary goals of Sound Check are:
- Volume Normalization: Sound Check helps to normalize the volume levels of songs. This means that regardless of whether a song was recorded at a higher or lower volume, Sound Check will modify the playback volume so that the overall loudness remains relatively uniform. This can be especially useful when you’re listening to a playlist or album with diverse audio levels.
- Consistency: Without Sound Check, you might encounter situations where a quiet song is followed by a much louder one, causing you to quickly adjust the volume. Sound Check minimizes this need for constant volume adjustment, creating a smoother transition between tracks.
- Ear Protection: Sudden spikes in volume can potentially harm your hearing, especially if you’re using headphones or earbuds. Sound Check helps protect your ears by preventing extreme variations in volume that might catch you off guard.
- Enhanced Listening: By reducing distractions caused by drastic volume changes, Sound Check allows you to focus more on the music itself, enhancing your overall listening experience.
However, it’s worth noting that Sound Check might not always be ideal for everyone. Some music enthusiasts prefer to experience the intended dynamics and volume variations of tracks as they were originally produced. In such cases, disabling Sound Check might be preferred.
Also Read: Troubleshooting Calendar Syncing Issues between iPhone and Outlook
What EQ is best on iPhone?
The “best” EQ (Equalizer) setting on an iPhone depends on your personal preferences, the type of music you listen to, and the quality of your headphones or speakers.
The EQ settings allow you to adjust the balance of different frequencies (bass, midrange, treble, etc.) to tailor the sound to your liking. Here are a few EQ presets you might consider trying out, but remember that the “best” setting is subjective and can vary from person to person:
- Flat: If you prefer a natural, unaltered sound, you can keep the EQ settings flat. This provides a balanced representation of the music without emphasizing any particular frequency range.
- Bass Boost: If you enjoy more pronounced bass in your music, you can use the “Bass Boost” preset. This setting enhances the lower frequencies, giving you a more robust and powerful bass response.
- Treble Boost: For those who like clear vocals and sharp instrumentals, the “Treble Boost” setting can be useful. It enhances the higher frequencies, making the vocals and instruments more prominent.
- Vocal Boost: If you primarily listen to vocal-centric music like podcasts, audiobooks, or vocal-heavy songs, you might consider using a “Vocal Boost” preset. This setting emphasizes the midrange frequencies where vocals typically reside.
- Rock/Pop: Many music apps offer genre-specific presets. The “Rock” or “Pop” EQ setting might enhance the bass and treble, providing a dynamic and energetic sound profile that suits those genres.
- Classical/Jazz: If you listen to classical or jazz music, an EQ setting that boosts the midrange frequencies can help highlight the nuances of acoustic instruments and intricate melodies.
- Custom EQ: For the most personalized experience, you can create a custom EQ setting by manually adjusting the sliders to your liking. This allows you to fine-tune the sound based on your specific preferences and the characteristics of your headphones or speakers.
To adjust the EQ settings on your iPhone:
- Open the “Settings” app.
- Scroll down and tap on “Music” (or “Playback & Sound” depending on your iOS version).
- Under the “Playback” section, tap on “EQ.”
- Choose the EQ preset that best suits your preferences or select “Off” to disable EQ.
Conclusion
SoundCheck is a hidden gem in the iPhone’s array of features. By ensuring consistent audio levels and preserving sound quality, it enriches your auditory journey across various media types.
Say farewell to abrupt volume changes and enjoy a harmonious listening experience. So, go ahead, enable SoundCheck, and embark on a seamless audio adventure!
