
How to Find SSID on iPhone? A Comprehensive Guide
Are you struggling to find the SSID on your iPhone? Don’t worry; we’ve got you covered! The SSID, or Service Set Identifier, is a unique name assigned to your wireless network. It allows your iPhone to identify and connect to your Wi-Fi network. Locating the SSID on your iPhone might seem like a daunting task, but fear not, as we’ll walk you through the process step by step. I was willing to find SSID on my iPhone for my FYP but due to lack of knowledge, I wasn’t able to find its location. All thanks to my partner, helping me a lot in this process. In this comprehensive guide, we’ll show you not only how to find the SSID on your iPhone but also provide you with some useful tips and tricks to optimize your wireless network.
Understanding SSID and Its Importance
Before we delve into the nitty-gritty of locating the SSID on your iPhone, let’s briefly understand the significance of the SSID. As mentioned earlier, the SSID is a unique name that distinguishes your Wi-Fi network from others in the vicinity. It acts as an access point identifier and helps your iPhone establish a secure connection to the correct network.
Locating the SSID on Your iPhone
Finding the SSID on your iPhone is a straightforward process. Follow these simple steps:
Step 1: Unlock your iPhone and navigate to the “Settings” app, which is represented by a gear icon.
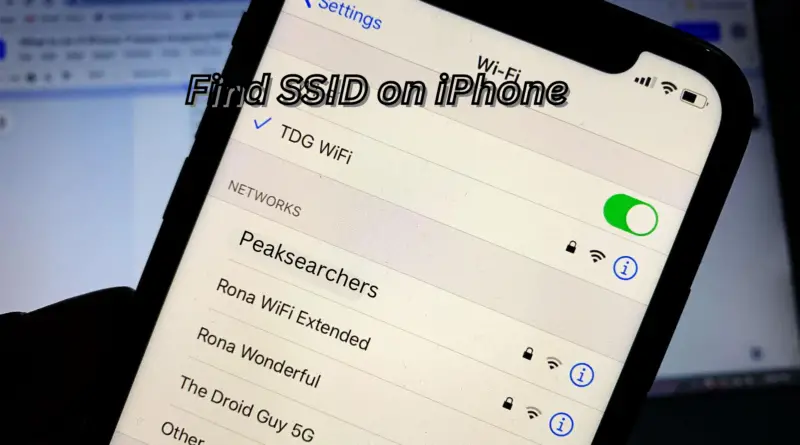
Step 2: In the Settings menu, tap on “Wi-Fi.” This will take you to the Wi-Fi settings page.
Step 3: On the Wi-Fi settings page, you will see a list of available Wi-Fi networks. The network your iPhone is currently connected to will have a checkmark next to its name.
Step 4: The name of the network with the checkmark is the SSID of your Wi-Fi network. This is the identifier you can use to connect other devices to the same network.
Optimizing Your Wi-Fi Network
Now that you’ve successfully found the SSID on your iPhone, let’s explore some tips to optimize your Wi-Fi network for improved performance and connectivity.
Tip 1: Secure Your Network with a Strong Password
A secure Wi-Fi network is essential to prevent unauthorized access to your internet connection. Set a strong password that includes a mix of upper and lower-case letters, numbers, and special characters. Avoid using easily guessable information like your name or birthdate.
Tip 2: Keep Your Router in an Ideal Location
The placement of your Wi-Fi router can significantly impact signal strength and coverage. Place your router in a central location within your home or office to ensure even distribution of the Wi-Fi signal. Avoid hiding the router behind furniture or placing it in enclosed spaces.
Tip 3: Update Firmware and Drivers Regularly
Manufacturers often release firmware updates to improve the performance and security of their routers. Check for updates regularly and install them to keep your router up to date.
Tip 4: Reduce Interference
Minimize Wi-Fi interference by keeping your router away from other electronic devices, such as cordless phones and microwaves. These devices can cause signal disruptions and affect your network’s performance.
Tip 5: Use Quality Networking Equipment
Investing in high-quality networking equipment, including routers and Wi-Fi extenders, can enhance your network’s performance and provide better coverage throughout your space.
Troubleshooting Wi-Fi Connectivity Issues
Encountering connectivity issues with your Wi-Fi network is not uncommon. Here are some common troubleshooting steps you can take:
Step 1: Restart Your Router: Sometimes, a simple router restart can resolve connectivity issues. Power off your router, wait for a few seconds and then power it back on.
Step 2: Check Network Password: Ensure that you have entered the correct password when connecting to the Wi-Fi network.
Step 3: Reset Network Settings: If you continue to face connectivity problems, you can try resetting your network settings on the iPhone. However, keep in mind that this action will remove all saved Wi-Fi passwords, so make sure you have them handy.
Step 4: Contact Your Internet Service Provider (ISP): If the issue persists, it might be a problem with your Internet service. Get in touch with your ISP to check if there are any service disruptions in your area.
Step 5: Update iPhone Software: Keeping your iPhone’s software up to date can resolve many bugs and issues, including Wi-Fi connectivity problems. Check for software updates regularly and install them when available.
Also Read: Why Did My iPhone Randomly Restart? Troubleshooting and Solutions
FAQ’s
What is my SSID on my iPhone?
The SSID is the name of your wireless network, and it is usually set by you or your network administrator during the initial setup of your Wi-Fi router. To find your iPhone’s currently connected SSID, you can follow these steps:
- Unlock your iPhone and go to the home screen.
- Open the “Settings” app.
- Tap on “Wi-Fi.”
- Look for the network name listed under “Choose a Network” or “Wi-Fi Networks.” That is your current SSID.
Please note that the SSID is not a secret and is broadcasted by your wireless router so that your devices can discover and connect to the network.
How do I manually add SSID to my iPhone?
To manually add an SSID (Service Set Identifier) to your iPhone, you can follow these steps:
- Unlock your iPhone and go to the home screen.
- Open the “Settings” app.
- Tap on “Wi-Fi.”
- Make sure that Wi-Fi is turned on by sliding the toggle to the right.
- Under “Choose a Network” or “Wi-Fi Networks,” you should see a list of available Wi-Fi networks. If the network you want to connect to is not listed, scroll down to the bottom of the list and tap on “Other…”
- In the “Other Network” screen, you will need to enter the SSID of the network you want to add. Make sure to enter the SSID correctly as it is case-sensitive and must match the exact name of the network.
- After entering the SSID, you will need to select the security type used by the Wi-Fi network. Common options include “WEP,” “WPA/WPA2 Personal,” or “WPA/WPA2 Enterprise.”
- If the network is secured with a password, you will be prompted to enter the password for the network.
- Once you have entered the SSID and any required password, tap “Join” or “Connect.”
If the entered information is correct, your iPhone will attempt to connect to the specified network. If the connection is successful, the SSID will be saved in your iPhone’s Wi-Fi settings, and your device will automatically connect to that network whenever it’s in range.
Please note that you should only manually add SSIDs for networks you have permission to access, as attempting to connect to unauthorized networks is against the law and can lead to legal consequences.
How do I connect my iPhone to Wi-Fi using SSID?
To connect your iPhone to Wi-Fi using an SSID (Service Set Identifier), you can follow these steps:
- Unlock your iPhone and go to the home screen.
- Open the “Settings” app. It looks like a gear icon.
- Tap on “Wi-Fi.” It’s usually the second option on the list.
- Make sure that Wi-Fi is turned on by sliding the toggle to the right. It will turn green when enabled.
- Your iPhone will automatically scan for available Wi-Fi networks. Once the scan is complete, you’ll see a list of available networks under “Choose a Network” or “Wi-Fi Networks.”
- Look for the SSID (network name) of the Wi-Fi network you want to connect to in the list. Tap on the SSID to select it.
- If the network is secured with a password, a prompt will appear asking you to enter the network password. Type in the correct password for the Wi-Fi network.
- After entering the password, tap “Join” or “Connect.”
- Your iPhone will attempt to connect to the Wi-Fi network using the provided SSID and password. If the information is correct, your device will establish a connection, and the Wi-Fi icon will appear in the top-left corner of the screen.
Please ensure you have the correct SSID and password for the Wi-Fi network you want to connect to. If you don’t have the necessary credentials, you may need to contact the network owner or administrator to obtain them. Additionally, remember that connecting to unauthorized Wi-Fi networks is against the law and may lead to legal consequences.
Where to find SSID on iPhone hotspot?
To find the SSID (Service Set Identifier) of your iPhone hotspot, follow these steps:
- Unlock your iPhone and go to the home screen.
- Open the “Settings” app. It looks like a gear icon.
- Tap on “Personal Hotspot.” It is usually located near the top of the Settings menu.
- In the “Personal Hotspot” section, you’ll find the name of your hotspot, which is the SSID. It will be listed under “Wi-Fi Password.”
The SSID of your iPhone hotspot is the name that other devices can see when searching for available Wi-Fi networks to connect to your hotspot. You can also change the name (SSID) of your hotspot in this section if you want to customize it. Just tap on the existing hotspot name, edit it, and then tap “Done” to save the changes.
Also Read: How to Turn Off Flash Notifications on iPhone? A Comprehensive Solution
Conclusion
Locating the SSID on your iPhone is a simple task that allows you to connect to your Wi-Fi network effortlessly. Remember, the SSID is the unique identifier of your network, and securing it with a strong password is crucial to prevent unauthorized access.
To optimize your Wi-Fi network’s performance, consider the placement of your router, use quality networking equipment, and keep the firmware and drivers updated. By following these tips and troubleshooting steps, you can ensure a seamless Wi-Fi experience on your iPhone.
Next time you need to find the SSID on your iPhone or encounter any Wi-Fi connectivity issues, refer back to this comprehensive guide for quick and effective solutions.
