
How To Fix Hampton Bay Ceiling Fan Stopped Working
If you’re reading this, you’re probably frustrated that the Hampton Bay ceiling fan in your bedroom, family room, or office just stopped working and you don’t know what to do about it!
You may not know much about electrical wiring so fixing it yourself seems like a daunting task, but it doesn’t have to be!
Just follow these simple steps and your ceiling fan will be as good as new. I am an expert in this field and I hope that you will be able to solve the issue by reading this article as I have a diploma in electrical equipment. I enhance DIY! This guide will help you through how to fix Hampton Bay Ceiling Fan Stopped Working issue quickly and easily!
Find The Problem
Before you can fix it, you’ll have to figure out what’s broken. Make sure your Hampton Bay fan is completely unplugged and that it has been for several minutes. The problem could be with a circuit breaker or blown fuse.
Unscrew your lightbulb, check that it is in good condition, and then plug in your fan and lightbulb once more to test them. If everything seems to work properly, there’s probably an issue with the wiring.
Disconnect The Power
Disconnecting power to a Hampton Bay ceiling fan can be dangerous, so if you are unsure of your abilities as an electrician, then it’s best to call a professional.
Most fans have a three-way switch that controls both speed and direction. There is typically one switch located at each end of the fan and one in the middle.
Start by turning off all switches individually. Then make sure that all power sources are completely disconnected from your ceiling fan. Do this by flipping any circuit breakers or fuses off.
If there are no breakers or fuses listed in your home, go outside and check any main electrical boxes on your property for breakers or fuses.
Remove The Cover
To continue on with your Hampton bay ceiling fan stopped working, you will need to remove its cover. There should be a few screws holding it in place so that you can take it off.
Remove those and then set it aside somewhere safe. Be careful not to let any parts slip out of your hands or you could break them (or worse).
The last thing you want to do is create more work for yourself by having to replace an important part of your ceiling fan when there’s an easier solution.
If everything else fails, contact a professional handyman company like US Handymen Inc for more help on how to fix Hampton bay ceiling fans that stopped working.
Clean The Blades
This is one of those simple fixes that most people forget to do, or don’t know how. If you see any buildup of dust on your fan blades, clean them with soap and water.
Here’s a quick tip: if you have a ceiling fan, it may be difficult to reach all of the blades because they are so high off of floor level. Try hanging a ladder close to your ceiling fan and cleaning each blade from there.
This will ensure that you get all areas of each blade clean.
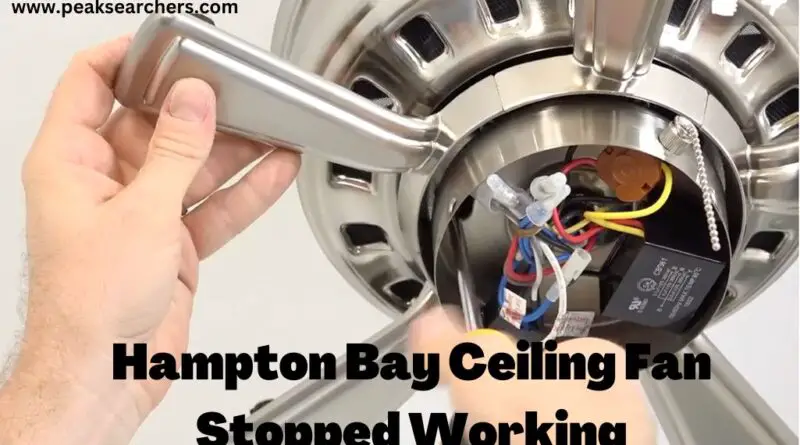
Fix The Electrical Wires
Before doing anything else, it’s essential that you disconnect your ceiling fan from any wiring. Doing so will make it much easier for you to get up on a ladder and work with your ceiling fan without any unexpected surprises.
Disconnecting your ceiling fan from its wiring can be done by using a wire nut, which is basically just like a fancy electrical twist-tie.
Simply strip off some wire (about an inch is fine), thread both ends through one of these special gadgets and wrap each end around either side of your two wires.
Next time you turn on your ceiling fan, you shouldn’t see any sparks!
Replace The Light Kit Or Light Bulb
With everything back in place, it’s time to reinstall your ceiling fan’s cover. You should also reconnect the power to your ceiling fan at this point.
The re-installation instructions that came with your particular model of the ceiling fan will explain how to do both of these things.
One key difference between reinstalling a ceiling fan and installing one is that you don’t have to worry about electrical connections when installing.
With re-installation, you can focus on exactly how all of those pieces fit back together – and whether or not they actually fit together.
Repeat until perfectly satisfied, then test it out before cleaning up any leftover debris from installation.
Reinstall The Cover And Connect Power
Remember to turn off and unplug your ceiling fan from the power source before you begin working on it. If your ceiling fan doesn’t have a light kit attached. Then you should use a screwdriver to remove screws in order to remove the top cover of your ceiling fan.
Most of these covers are lightweight and can be removed easily. After that, you need to install a new light kit if there is one with your replacement part.
This process will vary depending on the manufacturer but all kits contain wires that are already connected together with connector clips and electrical tape.
In some cases, they also come with detailed wiring instructions so read them carefully before installing any parts yourself.
FAQ’s
Hampton bay remote control ceiling fan not working
Many Hampton bay ceiling fan remote not working issues could be related to your Hampton bay remote control battery and one possible solution would be to replace it.
Before you begin, try and test if it is something wrong with your fan by connecting a different remote control device. If that works, then you should just need to change out the existing battery on your existing remote.
Refer to your manual for information about how best to do that. You might also find some good videos online from other Hampton bay ceiling fan owners who have had similar issues and learn from them as well.
The ceiling fan and light stopped working
One of the most common problems is to have a ceiling fan that turns on but no longer has any lights. While there are many different possibilities, it’s almost always a simple fix.
Here we’ll discuss how to identify and solve ceiling fan light, not working problems. If one or more of your lights suddenly stops working on your ceiling fan, start by making sure that you aren’t just dealing with a blown bulb.
It’s quite common for only one bulb in an entire fixture to blow out when a larger problem exists with other bulbs. Especially if they are enclosed within globes or shades.
How do I reset my Hampton Bay ceiling fan?
First, turn off the power then switch it back on again within 30 seconds of turning it on you will need to hold down the fan off button for 10 seconds. Doing this will reset it.
How do you fix a ceiling fan’s light that won’t turn on?
In some ceiling fans, you can remove just two screws to access and replace a burned-out light bulb. However, most modern ceiling fans are hard-wired into your home’s electrical system.
In order to get to your ceiling fan’s light bulb, you’ll need to turn off your home’s circuit breaker.
Also, go through: Fix Ceiling Fan Stopped Working Then Started Again
Conclusion
Fans are great additions to your home because they help keep you cool during hot summer days. But, when you want to Fix Hampton Bay Ceiling Fan Stopped Working like any other electrical equipment, they can also malfunction and make it tough to keep cool.
If you have a ceiling fan in your house that’s stopped working. It could be an easy fix or a more complex issue.
However, by first taking time to identify what’s causing your fan not to work. You can ensure that whatever solution you go with is effective and won’t leave you feeling sweltering for long!
